Note: The behaviors described below are from Mac OS X 10.4.10. Previous versions of the OS might not behave as described. YMMV.
Keyboard shortcuts are the life-blood of the power user. Casual users know of the basic ones: Command-Q to quit, Command-W to close a window, Command-F to find, etc, but the power users have them all memorized for every program they use. For them, actions that would take 3-5 seconds of arduous mouse work can be accomplished in as little as half a second of keyboarding. That’s up to a 10x increase in productivity! Heck, many individuals, myself included, can go for minutes without even touching the mouse.
But even the most vaunted power user might not know this trick.
Mac OS X (both Panther and Tiger) has a little-promoted feature that lets you customize some of those keyboard shortcuts for menu items. Even some global commands can be changed to suit your tastes. Don’t like Command-P to Print? Change it. You can even make it an F-Key and return some functionality to your keyboard’s top row. In some cases, you can give shortcuts to menu items that don’t have one.
There are some caveats however:
- When entering your new keyboard shortcut, you must make sure you type the Menu Item exactly as it appears in the Menu. Same spelling, capitalization and punctuation. Many menu commands end with an ellipsis, which you can type by pressing Option-; (semi-colon).
- Also, if you choose a key combo that already exists, in most cases, the new one will replace the old one, leaving the original without a shortcut. Some programs will assign the duplicate shortcut, but it just won’t work.
- Finally, there are apps that will not be affected by the changes you make. Photoshop, for one, uses its own internal shortcut customization scheme and won’t recognize anything you change in System Preferences.
So, having said all that, let’s apply it to iTunes.
The Macintosh version of iTunes, as you may well know, can extend its capabilities via AppleScripts, those little bundles of code that help with repetitive tasks, make organizing easier and add new features. A new Scripts Menu will appear in the Menu Bar when AppleScripts are installed  . If you’re reading an article on how to add a keyboard shortcut to them, you probably already know this. The beauty is that the system treats the Scripts Menu just like any other and you can add a keyboard shortcut to any script you have installed.
Identify Scripts

Start by opening iTunes. Click on the Scripts Menu and determine which scripts you want to add shortcuts to. Note their names as they appear in the drop-down. For this example, I’m selecting a Script called Embed Artwork. It copies album art downloaded from the iTunes Store into the individual music files; iTunes doesn’t do that by default, so I end up using it pretty frequently. I’ll also do Quick Convert, since I often use it to convert podcasts into audiobooks for faster listening.
Apply the Shortcuts
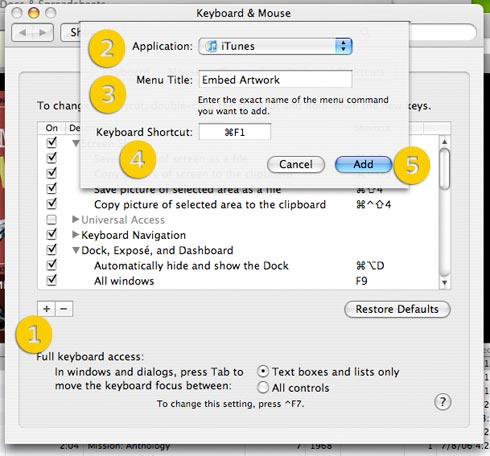
Open System Preferences. Select Keyboard & Mouse, then Keyboard Shortcuts. Click the + (plus) sign in the lower left, then select iTunes from the Applications pop-up. In the Menu Title field, enter the name of the script. In the Keyboard Shortcut field, press the key combo you wish to use. For Embed Artwork, I’m choosing Command-F1, Quick Convert gets Command-F2. A modifier key is required in iTunes. Stand-alone F-Keys, for whatever reason, will show up in the menu but they won’t do anything when pressed. When you’re satisfied, press Add to save.
Relaunch iTunes
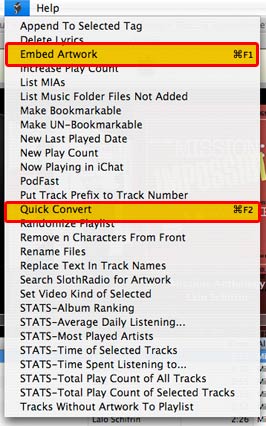
iTunes loads the keyboard shortcuts when it is launched, so quit and reopen it. When you click the Scripts Menu, you’ll see your new shortcuts displayed next to your script titles.
It is important to remember that configuring keyboard shortcuts, in general, is an inexact process. If something doesn’t work, find an alternative. I know I would love to use those F-Keys in iTunes. but for now, I’ll have to settle for the workaround. Still, these added functions will be a boon to anyone’s productivity.