Hopefully your day-that-happened-to-be-Christmas was full of family togetherness, holiday cheer, and of course, lucrative acquisitions. And once again Apple’s iPod dominated the retail scene. While sales figures aren’t out yet, I think there’s a strong possiblity that a new iPod was among those acquisitions ilounge claims more ipods sold in 2006 than 2001-2005 combined.
So, in the interest to providing security for all those iPods newly given and received, as well as those that have been hanging around, here’s a quick tip that will help to ensure the safety of your mp3 player in the event it becomes separated from you. It makes use of the iPod’s Notes feature and is something I’ve done with each iPod I’ve owned since I got my first one nearly five years ago has it really been five years?.
This procedure works for all iPods with a screen and the principle is simple. Drop a text file with the name Owner Info.txt into the Notes folder on your iPod. To do this, the iPod must be mounted as a drive on your desktop, which you can do by selecting Enable Disk Use from iTunes.
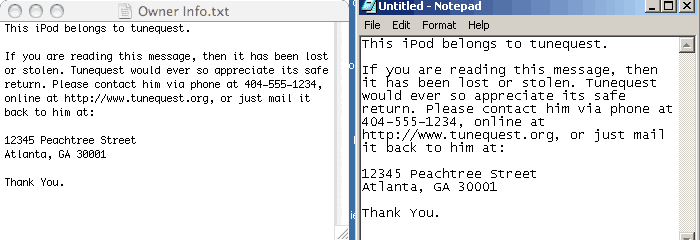
On Windows, use Notepad to create the file. By default, it saves a text file format, which is required for the note to work. On Mac OS X, use TextEdit, but make sure you must select Make Plain Text from the Format menu before saving.
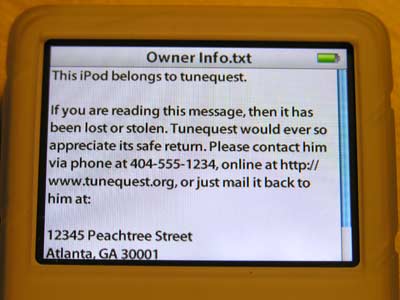
Inside this text file, type a short message about to whom the iPod belongs and ways to contact you: email, phone, website, instant messenger, etc. You can even include a physical address in hopes that some kind soul will mail it back to you or drop it off in person. In this case, it may be wiser to use a work address or P.O. box if you have one; you probably don’t want any nefarious types knowing where you live.
click to see full size.
When you’re finished with your message, save it with the filename Owner Info.txt into the Notes folder. On your iPod, browse to Extra > Notes > Owner Info.txt and you’ll see your message displayed on screen. Should you lose your iPod, the person who finds it can read your message and contact you to return it.
If you ever sell or give your iPod away, make sure you change or remove the file.
Weaknesses
Of course, this isn’t a fool-proof suggestion. It’s primarily designed to help honest people return a lost iPod and, to a certain extent, help buyers of second-hand iPods identify stolen property. If any would-be thieves are savvy enough, they can easily delete or change the Owner Info.txt. Though, once you save your file, you can always turn off Enable Disk Use to set up a roadblock. Even if someone resets the iPod by linking it to a new iTunes library, your owner message will remain intact.
Additionally, if you use a case with your iPod, drop a small slip of paper behind it with the same contact info. Then you’ll have one more avenue of protection in the event of loss or theft.
Hopefully though, the more people who do this, the more standard it will become. If this practice reaches a critical mass, like luggage tags on a suitcase, people will automatically know where to look to contact an iPod that’s lost its owner.