Part of the Faster Podcasts Series
- Speeding up podcasts:
Listen to more, faster – Part 1 - Speeding up Podcasts part 2:
Using Audacity to speed up MP3s - Speeding Up Podcasts part 3: Make Yourself an Audiobook

I established in the previous article that with all the interesting content out there, it can be quite daunting to listen to all those great podcasts. The ease with which iTunes lets you discover, subscribe to and manage podcasts can quickly lead to an overwhelming number of episodes and timespan to get through. "Podcast Overload" is a very real possibility.
I also noted in that article that Apple’s Quicktime Player application can be used for faster playback… if you happen to be sitting at a computer. But what if you want to take advantage of the "pod" part of a "podcast" and listen on-the-go?
Luckily for us all, there are a couple of ways to speed up your spoken word audio before you pack it up and take it with you. Specifically, there are two main approaches, and each has its advantages and weaknesses. The first method involves using an audio processing program to decrease the total running time of a podcast before copying it to your iPod. Alternately, if you have an appropriate model (4G and later or any Nano), you can format your files so that the iPod itself adjusts the playback speed in real-time.
This approach has two principal advantages:
- Flexibility: Audio processing gives you the greatest amount of control over the final playback speed of your podcasts. Speed it up by 10% or 200%, whatever works for you.
- Organization: Because you are editing and replacing the original downloaded podcasts, you can maintain the organizational functionality present in iTunes + iPod.
However, this approach comes with trade-offs:
- Processing time. Running an audio file through a sound editor takes time. If you want to increase the playback speed, you have to run it through the processor before dropping it onto your iPod.
- Potential Zero-sum changes. Whether a project is even worth attempting depends on the likelihood of a net gain in time. If it takes you 5 minutes of computer use + processing time to shorten audio by 4 minutes, then you would have been better off just listening to it in the first place. This consideration is increasingly relevant for older computers with slower CPU speeds and longer processing times.
- Inflexibility. Ironically, the other disadvantage of this approach is inflexibility. Once you’ve processed the file, you’re stuck with it. If you’ve happened to set the speed to a rate that is uncomfortable or impossible to listen to, then you’ll probably have to re-download the podcast and try again.
![]()
Bearing all that in mind, just how does one speed up a podcast? Easy: Audacity, an open-source audio program that’s packed with features, cross-platform, fairly simple to use, and of course, free. In fact, the program is most likely used in the actual production of many of the podcasts you’ll be modifying.
Additionally, you’ll need the LAME mp3 encoder to save your processed files back to mp3 after Audacity is finished with them.
Audacity also supports batch processing (called "Chains" in its parlance) that allows you to open multiple files, run filters, and save back to mp3 with just a couple of clicks. Not bad, but how’s it work with iTunes?
In basic form, the workflow looks like this:
- Podcast is downloaded. MP3 file is saved into your iTunes Music > Podcast folder and the appropriate entry appears in iTunes’ Podcast panel.
- Said mp3 file is opened in Audacity. Modifications are made.
- New, faster mp3 file is exported.
- Original mp3 is replaced.
- iTunes entry is updated with a shorter playing time.
- Profit?
Alright, now that we know what we’re in for, let’s walk through the procedure.
Install and Configure Audacity with LAME mp3 encoder
click to enlarge
Download Audacity and LAME encoder for your system. Version 1.3 (beta) is required for batch/chain processing.
Now to configure.
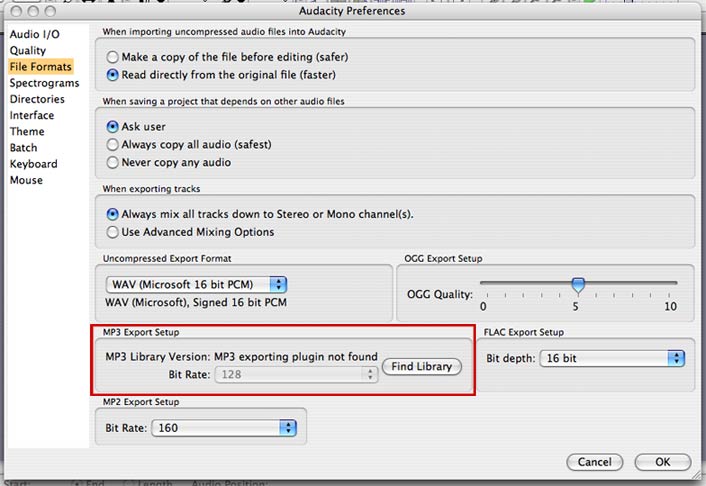
Once Audacity is installed, we need to tell it where the LAME encoder is. So, launch the program and select the Preference menu item. Under the file formats section, choose "Find Library" next to MP3 Export Setup. Also, choose the bitrate to save your modified podcasts at. Most podcasts are published between 64kbps and 128kbps. In my experience, 64kbps provides sufficient quality for listening to spoken word, though you should adjust it to fit your preference.
Next, we just need to set up a Chain. Chains are like scripts inside Audacity that automate a string of operations. For our purpose, we need to build a chain that imports the mp3, changes the tempo, and re-encodes it back to mp3. It’s really easy, so let’s get it set up.
click to enlarge
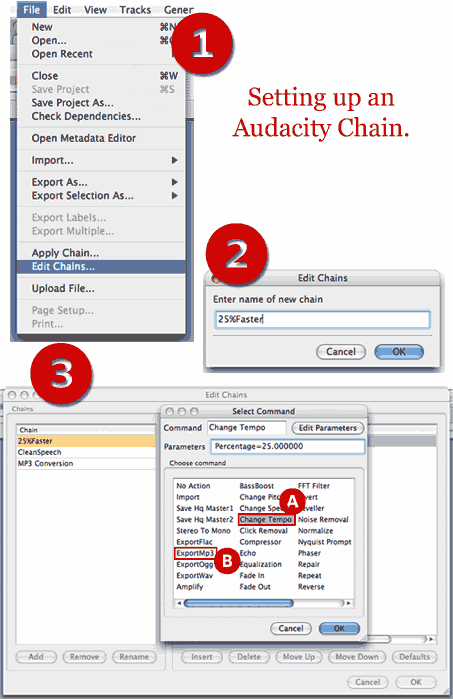
- From the File menu, select "Edit Chains." You’ll be presented with a box showing the pre-configured Chains.
- Click "Add" and give the Chain a name (ex: 25%Faster)
- Then click "Insert" to add a step to the process. You don’t need to tell the Chain to import a file. That happens automatically when you run it. So the first thing to do is select "Change Tempo" not Change Speed. Change Speed will affect the pitch of the audio, like speeding up a cassette tape or turntable (aka "chipmunking"). Change Tempo leaves the pitch as it is.
- In the Parameters field, enter to amount to speed up by. 20% will result in 48 seconds for every 60. 200% will result in 30 seconds for every 60.
- Next, click Insert again and select "ExportMP3." That will complete the Chain.
- At this point, you can create multiple Chains for different speeds if you want. One for 15%. One for 50%, etc. When you’re done, close the Chains window.
Two steps, that’s it. Change tempo -> ExportMP3.
Let’s Get Speedin’
Now that Audacity is all set up, we can do the actual processing.
- From the File menu, select "Apply Chain" and select the one you created earlier. Click "Apply to files."
- Navigate to where your podcast files are stored. Unless you’ve changed your iTunes settings, they’ll be in your "iTunes Music" folder, in a folder called "Podcasts."
- Select the files you want to speed up. On a Mac, hold down the Command/Apple key to select more than one file. On Windows, use the Control key.
- Click "Open." Audacity will begin processing the files. When it’s finished, you’ll see a folder called "cleaned" with your originally downloaded files. Inside that folder is your shiny new faster podcasts.
- Move the new files out of the "cleaned" folder. When asked if you want to over-write the existing files, say yes.
IMPORTANT: If you want the option of re-processing the files at a different rate, copy or duplicate (don’t just move) them to another folder before replacing. - Open iTunes and click on Podcasts from the source view. Select the episode that you modified. The time should change, but if it doesn’t, get info on it. That will force iTunes to refresh the display.
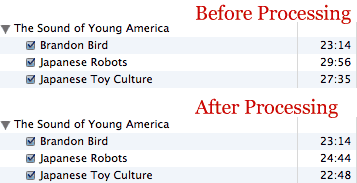
Ta-da. Welcome to the world of faster podcast listening. The next time your iPod is updated, the new faster podcasts will be copied and you can take them on the road.