Managing a Two iPod workflow is just too difficult

(or, Initial Thoughts on the iPod Touch)

iPods shuffle nano video classic and touch

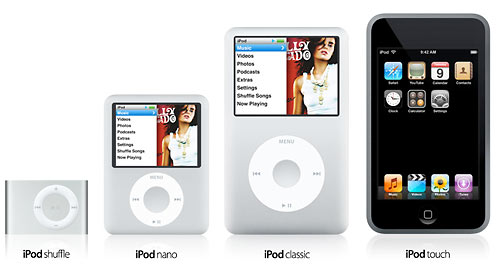
Weeeee… new toys from Apple! iPods iPods iPods, including shuffles in drab new colors (gimme orange), a new iPod NanoVideo (aka iPod Squat), an all-metal iPod Classic (the form we all know and love––now up to 160GB!) and a phoneless iPhone (aka iPod Touch).

Upon the availing of the line up this afternoon, I was immediately torn. In my mind, the iPod brand is essentially “a bajillion songs in your freakin’ pocket––more songs than you could ever practically listen to but who cares because it’s a bajillion songs! In your pocket!!” and the upgraded 160GB model is encoding a lot of digital saliva in tunequestland. The iPod has finally caught up to the point where I could realize the dream of fitting my entire library (all bajillion songs of it) onto a single portable device and that sounds like a lot of fun.

But Apple had to go ahead and simultaneously release that little portable wi-fi web browsing internet communication device, didn’t they? More than anything since the iPhone was announced in January, the prospect of in-your-pocket internet has been very appealing. But of course, I already have a phone that does everything I need a phone to do, so I wasn’t (and still am not) about to plunk down for the device. At the time I thought that if Apple wanted to unbundle the phone from the package, great, I’d look at it then.

And Apple has done just that with the iPod Touch and that is the source of my quandary.

The storage capacity of the iPod Touch’s models is 8GB and 16GB, a major step down from what I’m used to. While I did fine for years with a 15GB model, I’ve gotten accustomed to lugging around roughly 40-50 gigs of music, podcasts, audiobooks, courses from iTunes U, videos, photos and data at any given time. The thought of having to cram all that back to 16GB or gasp!, 8GB, is anathema to my idea of what an iPod is.

Then a thought occurred to me…

I’m still quite happy with my 80GB 5.5G model. I’ve had it for almost a year and the only major disappointment I have with it is my recently discovered long audiobook problem. I’ve been especially surprised by the durability of its screen. It’s not had any kind of protector and there’s nary a sign of a scratch or mark. While the idea of a 160GB iPod Classic is a very compelling dream, I’m more than happy to continue using my existing hardware as my workhorse iPod.

But… what if I were to simply use an iPod Touch almost exclusively as an internet device, saving most of the traditional iPod functions for my 80GB? That would be the ticket.

And for a moment, with the Reality Distortion Field set to maximum capacity, I seriously considered that option. Then I quickly came to my senses. I’ve tried managing multiple iPods for different purposes and it’s just too much effort. For a while, I tried to divvy up music and spoken audio (podcasts, books, etc) between two devices and invariably, I’d find that I didn’t have the one I wanted at the moment I wanted it. Then there was the hassle of keeping them both synced, updated and charged. Before too long, I abandoned that idea. Besides, when one device can do most or all of what you want it to, there’s really not much point to segregating the duties.

And the more I think about it, the less certain I become that I’d actually find a significant use for an iPod Touch. My multimedia needs are already handled by my 80GB and the vast majority of my wi-fi usage is done in my house, where there are four computers I have access to. Furthermore, based on the images at apple.com, I don’t see icons for some of the traditional “Extras” provided on the iPod’s interface, like Games and Notes (though I wouldn’t imagine that they’ve actual been removed). And where’s the note taking program to make use of that famous multi-touch interface? Other than for novelty, I can’t really see myself getting one, that is, until the storage is increased. Though that might change if it turns out the the Touch has inherited the iPhone’s PDF-reading capabilities. I’ve been wanting to make those portable documents truly portable.

But for now, the bottom line: I’m happy with what I got.

Of course, for me, this all a moot discussion unless iTunes 7.4 fixes 7.3’s horrible sorting problems, which, at first glance it doesn’t.

::

PS- Did anyone else notice that Music and iTunes are separate selectors on the Touch? I realize that using the term “iTunes” is Apple’s way of differentiating pre-loaded music from on-the-go purchasing, but it strikes me that that this could be a subtle shift in the iTunes branding away from the “your personal jukebox” function and toward the store aspects. If you look at Apple’s various iTunes pages, you’ll see that the money-making features are more prominently displayed.

Yeah, What They Said 5/06

Seis de Mayo edition. Yeah, What They Said, pointers to interesting stories. Some people call it “link sharing.”

::

Debunking the Myths of Peer to Peer in Regards to CD sales
From the horse’s mouth, the effect of file-sharing, peer to peer, downloading, and copying on a small indie label unaffiliated with any of the majors.

Kurt Cobain: the man, not the myth
Very nice write up of Kurt Cobain: About a Son, a new documentary about Cobain the person. “He was a caring person, he was a punk, he was a rock star, he was a charismatic asshole, he was a friend, a son, a husband and a father. Sadly, Cobain’s human traits got lost in the limelight.”

The New Music Industry
A prescription for music industry survival in this digital era? Four concepts every band should understand: People will share your music with one another; Music is not a product anymore, it is Content; Be the provider of your own content; Content is no longer limited by the product itself.

That last one is probably the most interesting.

The Sound of Young America: This is Your Brain on Music
Podcast interview with Daniel Levitin, a cognitive psychologist at McGill University in Montreal and author of This Is Your Brain On Music: The Science of Human Obsession. Fascinating stuff.

Why we’re so good at recognizing music
International Herald Tribune article about the same Daniel Levitin. He spent years working in the music industry before deciding to study the science behind it.

Link-back
On Classical Music Tagging (ID3 tags) for iTunes and iPod
This is one of my own. I wrote it nearly a year ago and in light of recent my remix album tagging tips, I thought I’d offer it again.

Also from tunequest, click this link to read a random post from the past. There’s no telling what you’ll get.

And here, because I’m listening to it while writing this, Sonic Youth: The Diamond Sea. Float away with it.

Speeding Up Podcasts part 3: Make Yourself an Audiobook

Part of the Faster Podcasts Series

  1. Speeding up podcasts:
    Listen to more, faster – Part 1
  2. Speeding up Podcasts part 2:
    Using Audacity to speed up MP3s
  3. Speeding Up Podcasts part 3: Make Yourself an Audiobook

faster podcast

This instructional is nearly two months late. Sorry folks. I know you’ve been dying to find out the quick and dirty way to add acceleration to your podcast listening. Onward, then.

A note before we begin, these instructions are for Mac users only, as they require the use of an AppleScript to modify audio files from within iTunes. Windows folks, however, can try a variation on this method.

So without further ado, here’s part three of the series:

By converting your podcasts into iTunes-flavored audiobook files, you can save yourself some time and listen to more, faster by accelerating the speed at which they play on-the-fly using your iPod.

In the previous two articles in this series, I described how to listen to podcasts (or any sound file really) faster by

  1. using Quicktime to adjust the playback speed
  2. using Audacity to process the mp3s

Method 1 is handy for quick adjustments if you happen to listen to podcasts while sitting at a computer. Method 2 gives you fine grain control over playback speed and allows you to put the faster files on MP3 players other than an iPod.

But what if you want to be able to listen to faster audio on the go, without having to wait for Audacity to process it? Then you let your iPod do the work on-the-fly. Starting with the 4th generation model, all iPods (and iPod nanos) are capable of playing audio back at a rate 25% faster than normal. To do this though, the audio file must be in a specific format, either an Audible.com audiobook (.aa) or a bookmarkable AAC (.m4b).

Not to worry, turning your podcast mp3s into a bookmarkable is a very simple and very fast process with the help of an AppleScript: Quick Convert. Download it and install per its directions.

But before we can use that script to do any converting, we need to do some setting up and organizing. Converting podcasts this way will make iTunes treat them as audiobooks. The files will be removed from the nifty Podcast manager and appear, instead, as a jumble under the Audiobooks tab. The new files will not be accessible through the iPod’s Podcast menu.

We’ll need to set up some Smart Playlists to ensure that our converted files end up on the road with us and are easy to find. To do so, hold down the option key and watch the plus sign turn into a widget. itunes widgets Click the New Playlist button. In the window that pops up, we can specify our criteria so that our bookmarkable podcasts appear in this playlist.

It only takes two selectors:

  1. Album is <<name of podcast>>
  2. Kind does not contain MPEG


Click for full size. This example features The Sound of Young America, which you really should be listening to.

Do this for each podcast subscription you have.

When you convert podcast episodes, the ID3 tags on the new files will be exactly the same as the original, but the type of file will have changed from MPEG to AAC audio. Therefore, whenever you convert a new podcast to audiobook form, it will automatically be added to the appropriate playlist.

If you’re not sure about the podcast title to put the Album selector, get info on an episode in iTunes’ Podcast pane and copy from there.

Once those playlists are ready to go, we can do the fun part, the actual conversion. For this we use the Quick Convert AppleScript. The script allows you convert to different audio formats without having to change settings in iTunes’ preferences.


Click for full size.

So let’s get going:

  1. Select all the episodes you want to convert to bookmarkable/accelerate-able format. From the Scripts menu in the menu bar script menu
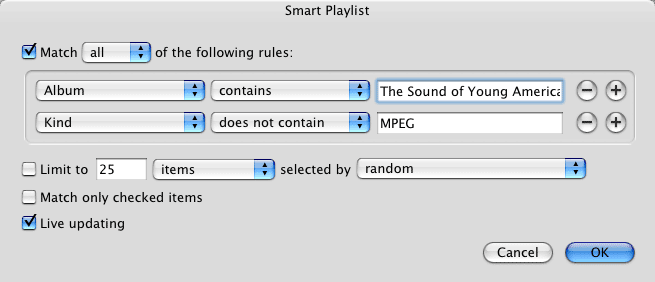
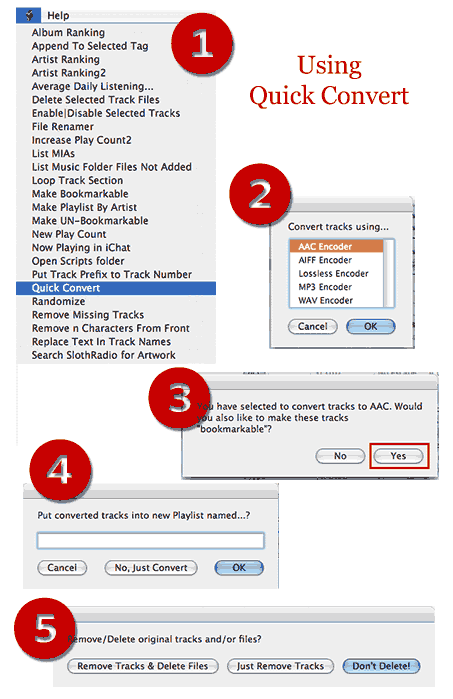
, which should be visible if you’ve installed at least one AppleScript, select Quick Convert.
  2. From the window that pops up, select AAC converter.
  3. You’ll be asked if you want to make it bookmarkable. Say Yes.
  4. Then you’ll be asked if you want to add it to a playlist. If you’ve set up your Smart Playlists above, it’s unnecessary, so say no.
  5. Finally, you’ll be asked if you
    1. want to delete the original file
    2. remove it from the library
    3. do nothing
      Personally, I usually have no use for the original once converted, so I choose delete. Select your own preference.

With all the options set, iTunes will begin converting the file. Your mileage will vary of course, but iTunes’ AAC encoder is generally speedy. My G4 PowerBook processes at around 8X speed while my Intel iMac clocks in at roughly 30X.

The next time you update/sync your iPod,your new playlists containing the converted files will appear in the Playlist menu. Podcasts can be accessed under the Audiobooks menu as well. When listening to these files, use the center Select button to adjust the playback speed. It comes in three flavors: Slower, Normal and Faster.

There you have it, an easy way to adjust the play rate on an iPod. Now get listening.

Speeding up Podcasts part 2:
Using Audacity to speed up MP3s

Part of the Faster Podcasts Series

  1. Speeding up podcasts:
    Listen to more, faster – Part 1
  2. Speeding up Podcasts part 2:
    Using Audacity to speed up MP3s
  3. Speeding Up Podcasts part 3: Make Yourself an Audiobook

faster podcast

I established in the previous article that with all the interesting content out there, it can be quite daunting to listen to all those great podcasts. The ease with which iTunes lets you discover, subscribe to and manage podcasts can quickly lead to an overwhelming number of episodes and timespan to get through. "Podcast Overload" is a very real possibility.

I also noted in that article that Apple’s Quicktime Player application can be used for faster playback… if you happen to be sitting at a computer. But what if you want to take advantage of the "pod" part of a "podcast" and listen on-the-go?

Luckily for us all, there are a couple of ways to speed up your spoken word audio before you pack it up and take it with you. Specifically, there are two main approaches, and each has its advantages and weaknesses. The first method involves using an audio processing program to decrease the total running time of a podcast before copying it to your iPod. Alternately, if you have an appropriate model (4G and later or any Nano), you can format your files so that the iPod itself adjusts the playback speed in real-time.

This approach has two principal advantages:

  1. Flexibility: Audio processing gives you the greatest amount of control over the final playback speed of your podcasts. Speed it up by 10% or 200%, whatever works for you.
  2. Organization: Because you are editing and replacing the original downloaded podcasts, you can maintain the organizational functionality present in iTunes + iPod.

However, this approach comes with trade-offs:

  1. Processing time. Running an audio file through a sound editor takes time. If you want to increase the playback speed, you have to run it through the processor before dropping it onto your iPod.
  2. Potential Zero-sum changes. Whether a project is even worth attempting depends on the likelihood of a net gain in time. If it takes you 5 minutes of computer use + processing time to shorten audio by 4 minutes, then you would have been better off just listening to it in the first place. This consideration is increasingly relevant for older computers with slower CPU speeds and longer processing times.
  3. Inflexibility. Ironically, the other disadvantage of this approach is inflexibility. Once you’ve processed the file, you’re stuck with it. If you’ve happened to set the speed to a rate that is uncomfortable or impossible to listen to, then you’ll probably have to re-download the podcast and try again.

audacity icon

Bearing all that in mind, just how does one speed up a podcast? Easy: Audacity, an open-source audio program that’s packed with features, cross-platform, fairly simple to use, and of course, free. In fact, the program is most likely used in the actual production of many of the podcasts you’ll be modifying.

Additionally, you’ll need the LAME mp3 encoder to save your processed files back to mp3 after Audacity is finished with them.

Audacity also supports batch processing (called "Chains" in its parlance) that allows you to open multiple files, run filters, and save back to mp3 with just a couple of clicks. Not bad, but how’s it work with iTunes?

In basic form, the workflow looks like this:

  1. Podcast is downloaded. MP3 file is saved into your iTunes Music > Podcast folder and the appropriate entry appears in iTunes’ Podcast panel.
  2. Said mp3 file is opened in Audacity. Modifications are made.
  3. New, faster mp3 file is exported.
  4. Original mp3 is replaced.
  5. iTunes entry is updated with a shorter playing time.
  6. Profit?

Alright, now that we know what we’re in for, let’s walk through the procedure.

Install and Configure Audacity with LAME mp3 encoder


click to enlarge

Download Audacity and LAME encoder for your system. Version 1.3 (beta) is required for batch/chain processing.

Now to configure.

Once Audacity is installed, we need to tell it where the LAME encoder is. So, launch the program and select the Preference menu item. Under the file formats section, choose "Find Library" next to MP3 Export Setup. Also, choose the bitrate to save your modified podcasts at. Most podcasts are published between 64kbps and 128kbps. In my experience, 64kbps provides sufficient quality for listening to spoken word, though you should adjust it to fit your preference.

Next, we just need to set up a Chain. Chains are like scripts inside Audacity that automate a string of operations. For our purpose, we need to build a chain that imports the mp3, changes the tempo, and re-encodes it back to mp3. It’s really easy, so let’s get it set up.


click to enlarge
  1. From the File menu, select "Edit Chains." You’ll be presented with a box showing the pre-configured Chains.
  2. Click "Add" and give the Chain a name (ex: 25%Faster)
  3. Then click "Insert" to add a step to the process. You don’t need to tell the Chain to import a file. That happens automatically when you run it. So the first thing to do is select "Change Tempo" not Change Speed. Change Speed will affect the pitch of the audio, like speeding up a cassette tape or turntable (aka "chipmunking"). Change Tempo leaves the pitch as it is.
  4. In the Parameters field, enter to amount to speed up by. 20% will result in 48 seconds for every 60. 200% will result in 30 seconds for every 60.
  5. Next, click Insert again and select "ExportMP3." That will complete the Chain.
  6. At this point, you can create multiple Chains for different speeds if you want. One for 15%. One for 50%, etc. When you’re done, close the Chains window.

Two steps, that’s it. Change tempo -> ExportMP3.

Let’s Get Speedin’

Now that Audacity is all set up, we can do the actual processing.

  1. From the File menu, select "Apply Chain" and select the one you created earlier. Click "Apply to files."
  2. Navigate to where your podcast files are stored. Unless you’ve changed your iTunes settings, they’ll be in your "iTunes Music" folder, in a folder called "Podcasts."
  3. Select the files you want to speed up. On a Mac, hold down the Command/Apple key to select more than one file. On Windows, use the Control key.
  4. Click "Open." Audacity will begin processing the files. When it’s finished, you’ll see a folder called "cleaned" with your originally downloaded files. Inside that folder is your shiny new faster podcasts.
  5. Move the new files out of the "cleaned" folder. When asked if you want to over-write the existing files, say yes.
    IMPORTANT: If you want the option of re-processing the files at a different rate, copy or duplicate (don’t just move) them to another folder before replacing.
  6. Open iTunes and click on Podcasts from the source view. Select the episode that you modified. The time should change, but if it doesn’t, get info on it. That will force iTunes to refresh the display.

podcast before and after

Ta-da. Welcome to the world of faster podcast listening. The next time your iPod is updated, the new faster podcasts will be copied and you can take them on the road.

Speeding up podcasts:
Listen to more, faster – Part 1

Part of the Faster Podcasts Series

  1. Speeding up podcasts:
    Listen to more, faster – Part 1
  2. Speeding up Podcasts part 2:
    Using Audacity to speed up MP3s
  3. Speeding Up Podcasts part 3: Make Yourself an Audiobook

faster podcast

The first in a multi-part series dealing with speeding up the play rate of podcasts so you can listen to them faster and fit more subscriptions into your schedule. Part One: The problem at hand and a simple computer-based solution.

UPDATE: Toward the end of this article, I point to some scripting techniques to automate the acceleration of podcasts with QuickTime. Well, Mac users, it’s your lucky day because I went ahead and complied an AppleScript that opens a selected podcast in QuickTime Player and allows you to set the playback rate. I’ve taken to calling it PodFast. Download it.

Dilemma

After about a year on hiatus, I recently got back into the swing of listening to podcasts. The podcastosphere has exploded in the past twelve months and beyond old favorites such as Sound of Young America and EscapePod, everyday seems to introduce me to new, awesome content. There’s Grammar Girl’s writing tips, and Darker Projects’ Section 31 adventures, the WordPress community podcast, foreign languages, and NPR as well as many more news, education and entertainment podcasts. Heck, even the U.S. Department of State has a podcast.

With all that good stuff, it’s easy to become a podcast junkie at the expense of your music, books, magazines, TV, movies, pets, friends, family and career.

With each compelling episode, you crave more and more, to the point where they start to seriously suck up your time. While some, like Grammar Girl’s, only run about 5 minutes, the average length of a podcast episode ranges from 20 to 40 minutes. Some podcasters are aware of the time burden that a podcast can create, but even those who try to produce short episodes tend to drastically underestimate the amount of time needed to convey all the info they wish.

Solution: Speed it up.

Most recorded media can be sped up by a few percentage points without any perceptible change. Depending on the particular characteristics of the sound, podcasts of spoken word can usually maintain their intelligibility at significantly higher increases. The iPod’s built-in accelerator increases playback in real-time by 20% without changing the pitch or interfering with the ability to understand what is being said (though it does falter when dealing with low, muffled voices).

That’s great if you happen have a later-generation iPod. But not everyone does, so I would suggest to all podcast producers that time compressing your episodes by 5-10% has its benefits. For podcasters there’s smaller files and less bandwidth used, and subscribers enjoy faster downloads and shorter listening times.

While some podcasters might adopt that practice, it is probably never going to become widespread. So lets us take an end-user centric approach. What solutions exist to speed up a podcast once it is downloaded?

Computer-bound playback

quicktime logo
A lot of people listen to podcasts while sitting at their computer. The iTunes program itself, unfortunately, has only one speed: normal. When you press play, what you hear is what you get. You’re stuck with whatever the podcaster uploaded, whether it’s spoken with perfect tempo or with an agonizingly slow drawl. There’s just no option to adjust the speed on either a global level or for individual tracks.

QuickTime Player however, does allow you to easily change the playback rate in real-time. You can speed through filler material as effortlessly as you can slow down complicated sections (especially useful for foreign language podcasts). QT Player has the additional advantage of supporting video podcasts, so you can adjust the play rate of those as well. Currently, no portable player can do that.


click to see larger

To open a podcast file in QuickTime Player, select its entry in iTunes’ Podcast panel. On Mac OS X, select “Reveal in Finder” from the File menu (command R). On Windows, select “Show in Windows Explorer” from the file menu (control R). You can then drag the mp3 to QuickTime Player.

QuickTime is required by iTunes, so if you have it installed, then you already have QuickTime. To access playback options, select “Show A/V Controls” from the Window menu.

Scripting

You can streamline the process of getting the files into Quicktime by using some of these scripting techniques at MacOSXHints.com. They include ways to automatically set the playback speed when the file is sent to QuickTime and increase the file’s play count so that iTunes will continue to download fresh episodes. It’s mostly AppleScript for the Mac, but there is one JavaScript for Windows option.

If you use iTunes to manage your podcast subscriptions and downloads and do most of your listening while working at your computer, then QuickTime is pretty much the most simple, best way to speed up that process.

But what if you use an iPod or other mp3 player to make your podcasts portable? There are a couple methods for accelerating your listening on-the-go. Try this one.