Tagging Remix and DJ Albums for iTunes and iPod

Remix albums and DJ albums have always proved a challenge to tag in a useful and logical manner because of how they differ from the traditional song-artist-album tagging model. Like compilations, remix albums typically include songs by a variety of artists and musicians. But they are released under the banner of a single artist and it is that artist that I associate that album with. For example, the album Brazilification has tracks by 18 different artists, all remixed by Fila Brazilia. Most, if not all the songs had been published before on each of the remixed artist’s own records or singles, but Brazilification collects them all and releases them under Fila Brazilia.

Oh what to do, what to do? The standard tagging fields don’t offer a clean way to deal with remix albums, so I’ve had to cobble together my own solutions. The methods I use have to be simple and straightforward to use on an iPod, whose navigation options is more limited than iTunes, but it also has to include all the pertinent information, song name including remix title, remixer, original artist and the album (plus genre and year).

Below are the two approaches I’ve developed. Neither one has really worked to my 100% satisfaction, though.

Method One: Remixer as Artist

This scheme is the more predominate one in my library. I’ve been using it for a long time, but have never been that happy with it. In a sense, the remixer is treated as though they have created a cover version of the original.

Artist Tag

Iin my mind, I associate the remixer/dj as the primary artist. It does have their name on the album cover after all. Thus, using the example above, Fila Brazillia is listed in the Artist field.

Album tag

The album tag, of course, is the album name.

Song Title

There’s no easy way to account for, identify and display the originating artist when the remixer is using the Artist field, so they are added to the beginning of the song name using this syntax:

Radiohead: Climbing Up the Walls

This way, I can easily navigate to the album on my iPod, glance at the track listings and see both the original artist and the song title.

Composer Tag

To make locating remixes in general easier, using my Composer tag guidelines, I identify the original artist again in the Composer tag, but surrounded by parentheses to separate them from actual composers.

Problems

This approach doesn’t work semantically. It puts inappropriate data in inappropriate fields in order to make the system function. To continue with the example above, song is technically titled Climbing Up The Walls (Fila Brazillia Mix) and the actual artist is Radiohead. If I had a copy of Radiohead’s Karma Police single, where the remix originally appeared, Radiohead would, quite properly, receive the artist tag.

Also, The scheme doesn’t play nice when my iTunes library interfaces with third-party applications. The song above is submitted to Last.fm as Fila Brazillia – Radiohead: Climbing Up the Wall, which acheives a disservice for both artists. On the site, it pollutes Fila Brazillia’s database of songs and at the same time, doesn’t provide proper credit to Radiohead.

Because the Artist tag has been misappropriated, this contorted design can interfere with statistics. And anyone who’s spent time around here knows that when it comes to my iTunes library I’m a statistics nut.


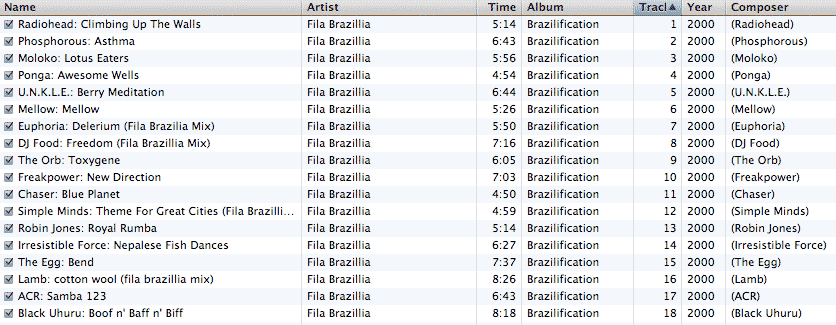
Brazilification using this first method. click to enlarge.

Additionally, I find it redundant to enter the original artist in two different places. I’ve been relatively unhappy with the scheme, so I recently began to explore other options.

Method Two: Remixer as “Composer”

One idea I’ve been toying with is swapping the Artist and Composer tags in the above scheme. Thus:

Artist Tag

The original artist name. (Ex. Radiohead). Gives appropriate credit source artists and allows them to be included in Smart Playlists that factor artists.

Compilation tag

Under this configuration, there would be multiple artists on the album, so the Compliation check box must be checked.

Album Tag

Takes the form of Remixer/DJ: Album Name (ex: Fila Brazillia: Brazilification). For easy identification when browsing. However, it does present another semantic problem in that it offers more information the album’s actual name. So the remixer could be left out. I’ll have to see how it works in practice.

Song Name

Song name (remix) (ex: Climbing Up the Walls (Fila Brazillia Mix). It’s only appropriate to give each song its appropriate name.

Composer

The remixer, again surrounded by paranthasese to keep it separated and sorted from actual composers.

Instinctively, I like this design. I’ve not really had a chance to implement it on a large scale, but it holds potential to address the concerns I have with my current scheme.

Yes, it still has some redundancy, with the remixer listed both in the song name, album title and composer tag. However, with direct compilation support on newer model iPods, the use of the remixer in the album or composer tag could be omitted.

Using the Album Artist tag to identify the remixer/dj would actually solve all the problems with this plan. But the iPod’s current lack of support for the field leaves me having to use these workarounds. Let’s hope that Apple adds that increased functionality soon.

In any case, this new tagging format promises to make it rather easy to locate and identify all the songs, artists and remixers in both iTunes and the iPod. It also will work with Last.fm submissions and sorts everything nicely for my all-important statistics.


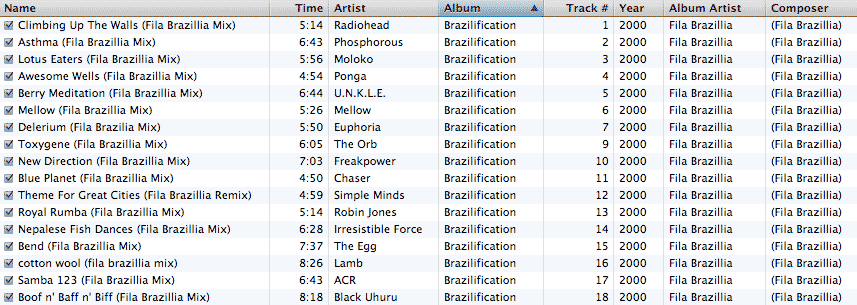
Brazilification using this second method. click to enlarge

Can anyone tell me why my iPod’s album art is a thumbnail?

OK…

CD and vinyl album covers generally come in the shape of a square. The iPod’s screen is a 4:3 rectangle. It makes sense that when displaying album art at full screen, the display would be limited to the short edge of the display, thus the white borders on the left and right sides.

So my question is, why, when I have album art that is not square, but closer to the aspect ratio of the iPod, does it still display with the white borders on the left and right?

Take a look at this image:

dismemberment plan small album art

It’s this rather kick-ass shot of the Dismemberment Plan that I’m using as the album art for the recording of a live show. Notice how it’s is in a widescreen ratio? Also notice how it has the same white borders as regular album art, plus some extra thick borders on the top and bottom?

Why does the iPod not scale the image so that I fills up as much of the screen as possible?

I know the iPod has the ability to do that. Just look at the same jpeg, but using the iPod’s Photo capability:

dismemberment plan large photo art

Full screen and lookin pretty cool. I much prefer it that way. So Apple, when you get a chance, please take care of this little over sight.

Until then, I’ll just had to settle for the thumbnail.

Speeding Up Podcasts part 3: Make Yourself an Audiobook

Part of the Faster Podcasts Series

  1. Speeding up podcasts:
    Listen to more, faster – Part 1
  2. Speeding up Podcasts part 2:
    Using Audacity to speed up MP3s
  3. Speeding Up Podcasts part 3: Make Yourself an Audiobook

faster podcast

This instructional is nearly two months late. Sorry folks. I know you’ve been dying to find out the quick and dirty way to add acceleration to your podcast listening. Onward, then.

A note before we begin, these instructions are for Mac users only, as they require the use of an AppleScript to modify audio files from within iTunes. Windows folks, however, can try a variation on this method.

So without further ado, here’s part three of the series:

By converting your podcasts into iTunes-flavored audiobook files, you can save yourself some time and listen to more, faster by accelerating the speed at which they play on-the-fly using your iPod.

In the previous two articles in this series, I described how to listen to podcasts (or any sound file really) faster by

  1. using Quicktime to adjust the playback speed
  2. using Audacity to process the mp3s

Method 1 is handy for quick adjustments if you happen to listen to podcasts while sitting at a computer. Method 2 gives you fine grain control over playback speed and allows you to put the faster files on MP3 players other than an iPod.

But what if you want to be able to listen to faster audio on the go, without having to wait for Audacity to process it? Then you let your iPod do the work on-the-fly. Starting with the 4th generation model, all iPods (and iPod nanos) are capable of playing audio back at a rate 25% faster than normal. To do this though, the audio file must be in a specific format, either an Audible.com audiobook (.aa) or a bookmarkable AAC (.m4b).

Not to worry, turning your podcast mp3s into a bookmarkable is a very simple and very fast process with the help of an AppleScript: Quick Convert. Download it and install per its directions.

But before we can use that script to do any converting, we need to do some setting up and organizing. Converting podcasts this way will make iTunes treat them as audiobooks. The files will be removed from the nifty Podcast manager and appear, instead, as a jumble under the Audiobooks tab. The new files will not be accessible through the iPod’s Podcast menu.

We’ll need to set up some Smart Playlists to ensure that our converted files end up on the road with us and are easy to find. To do so, hold down the option key and watch the plus sign turn into a widget. itunes widgets Click the New Playlist button. In the window that pops up, we can specify our criteria so that our bookmarkable podcasts appear in this playlist.

It only takes two selectors:

  1. Album is <<name of podcast>>
  2. Kind does not contain MPEG


Click for full size. This example features The Sound of Young America, which you really should be listening to.

Do this for each podcast subscription you have.

When you convert podcast episodes, the ID3 tags on the new files will be exactly the same as the original, but the type of file will have changed from MPEG to AAC audio. Therefore, whenever you convert a new podcast to audiobook form, it will automatically be added to the appropriate playlist.

If you’re not sure about the podcast title to put the Album selector, get info on an episode in iTunes’ Podcast pane and copy from there.

Once those playlists are ready to go, we can do the fun part, the actual conversion. For this we use the Quick Convert AppleScript. The script allows you convert to different audio formats without having to change settings in iTunes’ preferences.


Click for full size.

So let’s get going:

  1. Select all the episodes you want to convert to bookmarkable/accelerate-able format. From the Scripts menu in the menu bar script menu
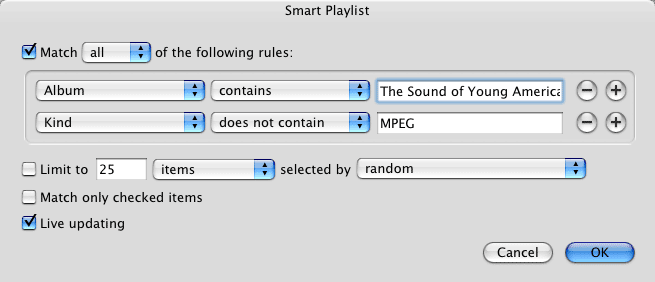
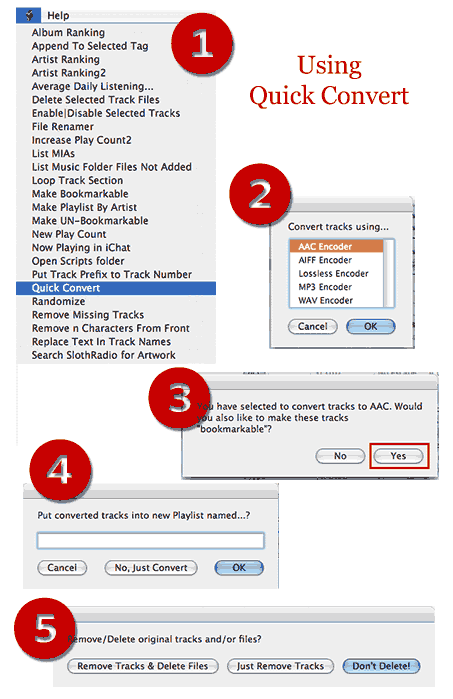
, which should be visible if you’ve installed at least one AppleScript, select Quick Convert.
  2. From the window that pops up, select AAC converter.
  3. You’ll be asked if you want to make it bookmarkable. Say Yes.
  4. Then you’ll be asked if you want to add it to a playlist. If you’ve set up your Smart Playlists above, it’s unnecessary, so say no.
  5. Finally, you’ll be asked if you
    1. want to delete the original file
    2. remove it from the library
    3. do nothing
      Personally, I usually have no use for the original once converted, so I choose delete. Select your own preference.

With all the options set, iTunes will begin converting the file. Your mileage will vary of course, but iTunes’ AAC encoder is generally speedy. My G4 PowerBook processes at around 8X speed while my Intel iMac clocks in at roughly 30X.

The next time you update/sync your iPod,your new playlists containing the converted files will appear in the Playlist menu. Podcasts can be accessed under the Audiobooks menu as well. When listening to these files, use the center Select button to adjust the playback speed. It comes in three flavors: Slower, Normal and Faster.

There you have it, an easy way to adjust the play rate on an iPod. Now get listening.

Thoughts on the Apple TV: A Possible Alternative

Part of the Thoughts on the Apple TV Series

  1. Thoughts on the Apple TV: Hard Drive Perils
  2. Thoughts on the Apple TV: Format Woes
  3. Thoughts on the Apple TV: A Possible Alternative

Philips’ DCP850 DVD player with iPod Dock

Though sold and marketed as a portable device, I’ve recently been intrigued by Philips’ new DCP850 DVD player with integrated iPod dock. It boasts support for standard DVD, DVD+/-R(W), VCDs, DivX files, MPEG-4 files, compact discs, MP3s and photos. It also features an SD/MMC card reader for playing movies and photos via a memory card. The iPod dock, of course, charges the iPod and allows access to and playback of all the content on it.

It’s not fancy wireless like the Apple TV, but the DCP850 certainly seems more versatile. At $199, it’s $100 cheaper than the Apple TV as well.

Using standard A/V cables, the DCP850 can be connected to a television and I’m thinking I might eventually replace my DVP642 with it in my set-top setup. Being portable would just be a seldom-used perk. The device will accept and play all the DVDs and DivX files I currently have in my collection, plus any videos on my iPod, which tend to be transitory M4V files. And the SD card reader opens up a lot of possibilities for replacing the CD-RWs I currently use for temporary AVI files and non-H.264 M4Vs as well.

At the moment, the DCP850 is so new that there’s not a lot of real world reviews of it, but I’m certainly keeping my eye on it.

More Info:
DCP850 at Philips.com
Review at ilounge.com
Get one from Amazon.com

Thoughts on the Apple TV: Format Woes

Part of the Thoughts on the Apple TV Series

  1. Thoughts on the Apple TV: Hard Drive Perils
  2. Thoughts on the Apple TV: Format Woes
  3. Thoughts on the Apple TV: A Possible Alternative

Apple TV and Philips’ DVP642

When it comes to digital video, I’m no novice. Several years ago, I made my own VCDs and, as the technology developed, moved to the DivX/XviD codec. I also already own a Philips DVP642 DVD player, which can play DivX/XviD-flavored AVI files in addition to standard DVDs. In fact, I have a much-neglected site dedicated to Mac users who own the DVP642.

The conundrum is that, out of the box, the Apple TV will play Apple-approved video formats, M4V using mpeg-4 and H.264 codecs, but not AVI using Divx/XviD, while the opposite is true of the DVP642. Additionally, the Apple TV, of course, does not have any kind of disc player, which makes it hard to use my existing video collection.

I already have a substantial number of files in DivX format, tucked away on DVDs, ready to be played on short notice. I’m not exactly keen on the idea of having to spend the time to convert those files to M4V, store them on a drive and then manage them in my iTunes library, which is already bursting with music alone, especially when I can just watch them on my DVD player with zero additional effort.

Now, I’m not entirely dissin’ the Apple TV. Paul points out that if you can get the full Mac OS X installed, the thing makes an attractive file/web/torrent box and Apple Gazette says that it’s well-suited to watching video podcasts. But after more than a year and a half of owning a DVP642, I must say that I find the DivX+DVD to be both an excellent usage method and an expedient storage scheme. It does lack the polish and finesse of Apple’s solution, but it works, is cheap and scales well.

Complicating matters, however, is the fact that I also own an iPod with video. Like the Apple TV, it only plays M4V. After six months of use, I’ve discovered that iPod video is great for temporary content, videos that I’m going to watch and delete, whether it’s a recent episode of The Daily Show or a movie for a long plane ride. When I’m finished with it, into the trash it goes, freeing me of management headaches and storage concerns.

The downside is that it can be unwieldy to watch an M4V file (or iTunes Store purchase) on my TV, should I so desire. In a pinch, I can connect my iPod to the TV using a cable that came with my six-year-old camcorder, but that’s a bit of a hack.

If only there were a device that would let me easily watch (read:no hacking) both my more timely M4V files, as well as archival AVI and regular DVDs.

Thoughts on the Apple TV: Hard Drive Perils

Part of the Thoughts on the Apple TV Series

  1. Thoughts on the Apple TV: Hard Drive Perils
  2. Thoughts on the Apple TV: Format Woes
  3. Thoughts on the Apple TV: A Possible Alternative

AppleTV

So the much-anticipated Apple TV has shipped and, of course, the extreme early adopters are having a field day tearing the thing apart to find out what it can do. Some clever folks have already been able to install larger hard drives, more video codecs, and even the full version of Mac OS X, rendering what Cult of Mac calls a “Mac Nano.”

To be sure, it looks like an impressive device. But I probably won’t be buying one for two principal reasons, neither of which is the fact that I don’t have an HDTV set.

Reason 1: The perils of hard disk storage

Having been a participant in the digital media revolution for 10 years, I see some parallels between the state of video today and the state of audio in the late 90s. A decade ago, you were lucky if you had more than 10 GB of internal storage in your computer. With the overhead of operating systems and applications, there was a limited amount of storage on that drive for the MP3 scene’s early adopters. Even at just 3 MB per song, that drive would fill up fast. An external drive would cost you $300-400 for 6 GB of space, but that too would fill up before too long. At the time, one solution was the small, but growing market for writable CDs, which cost about $2 for a single 650 MB disk (in addition to the several hundred dollars for the 2X burner itself).

Similarly, while storage conditions have kept pace with growing file sizes, today’s digital video market faces some of the same logistical hard disk challenges for the end user. Apple’s own estimates say that a 45-minute TV show will run you 200 MB and a full-length movie is 1.0-1.5 GB. A modest collection of 100 movies will cost you 100-150 GB of hard disk space. Add to it complete TV seasons and expect that to grow substantially. Using Apple’s numbers, the entirety of the Star Trek franchise would use ~155 GB of disk storage.

To be sure, today’s hard drives are indeed up to the task of holding a large video library. 500GB disks can be had for less than $200, ensuring plenty of room for an expanding selection of movies. But whether you encode videos yourself or buy from the iTunes Store, that library will represent a hefty investment of time and money. And the most dreaded event in computerdom can wipe it all out in an instant: a hard drive crash.

Any reasonable, non-risk-taking person is going to want to implement (and practice) a regular backup plan for their media. The most convenient choices are to purchase a second (and possibly third) drive to house copies of all the video files, or make regular trips to the DVD-R burner for offline backups. The hard drive option would offer nearly instantaneous recovery to an iTunes+AppleTV-based media system, but it would double (or triple) your upfront costs. Additionally, if and when one of those drives fails, it will have to be replaced at the current market price for hard drives.

True, the arguments I made in defense of digital music can apply to digital video as well. But, for the present, there’s a matter of scale which makes the effort more cumbersome for video. Plus, a music library containing a large number of songs with short playing times benefits more from the instant accessibility and portability of the iTunes+iPod model than a video library with relatively few entries and long playing times.

Thus, for me, the more appealing scenario for personal digital video is that of the burned DVD because, with the right DVD player, your “backups” can double as working copies. Thankfully, it’s also much, much cheaper per megabyte than CDs were 10 years ago.

Which brings me to:

Reason 2: Incompatible video formats.

What’s in a star rating?

Yesterday, I wrote a detailed article about the new formula I’m using to quantify the overall quality of albums in my iTunes library. It’s been working for me, but I realized that everyone rates their music differently. Webomatica, for example, explains in the comments that his song ratings are relative to other songs by the same artist.

So I’d like to explain the thought process that goes into my rating system. I’ve been using the same star rating criteria for years and that system has gone a long way toward helping me maintain control over my sprawling library. It allows me to quickly construct playlists of quality music, which is the single largest goal I have when managing and utilizing my library.

When thinking about a song’s rating, I basically need it answer one question: How likely I am to want to hear this song again? They are not designed to attribute a greater cultural value to a song, though the song’s general artistic worth plays a large role in the rating it receives. I’m more likely to enjoy a high-quality song and thus want to listen to it more often.

The rating is essentially a weighted vote for helping me determine how often a particular song gets played in the future. The breakdown looks like this:

  • Rating: ★★★★★ 5 stars: This song is excellent. It shows poise and craftsmanship and I’m pretty much guaranteed to enjoy this one the next time.
  • Rating: ★★★★☆ 4 stars: This song is very good. Well done and not off-putting, I’ll most likely enjoy this again, but it’s not brilliant enough to be a 5. The majority of songs in my library fall into this rating.
  • Rating: ★★★☆☆ 3 stars: This song is good. I’m not going to go out of my way to hear this one, but if I’m listening to an album beginning-to-end, I won’t skip it.
  • Rating: ★★☆☆☆ 2 stars: This song wasn’t very good. I’m fairly certain I’ll never want to hear it again. These songs are candidates for deletion. If any song stays at 2 stars for long enough, it is either upgraded to 3 stars or removed from the library.
  • Rating: ★☆☆☆☆ 1 star: Not used for rating purposes. Instead, songs that are marked with 1 star are taken out of circulation, usually because of encoding problems or bad ID3 tags. Its normal rating is returned when the problem is solved. Additionally, special audio such as comedy or spoken word is automatically given 1 star to keep it from mingling with music.
  • It is also worth noting that my ratings are not static. As my tastes fluctuate, I’ve been known to change them. It doesn’t happen often, but sometimes a 4 star song might become a 5. Or it could fall to a 3 if whatever aspect of the song I found appealing the last time I heard it is missing. In one extreme example, a song went from 5 to 2 stars and was subsequently deleted.

    There you have it. That’s where I’m coming from as I discuss song and album ratings on this site. I’d be interested to know how other people handle ratings in their iTunes libraries?